
How to Use Webhooks (Upflowy API)

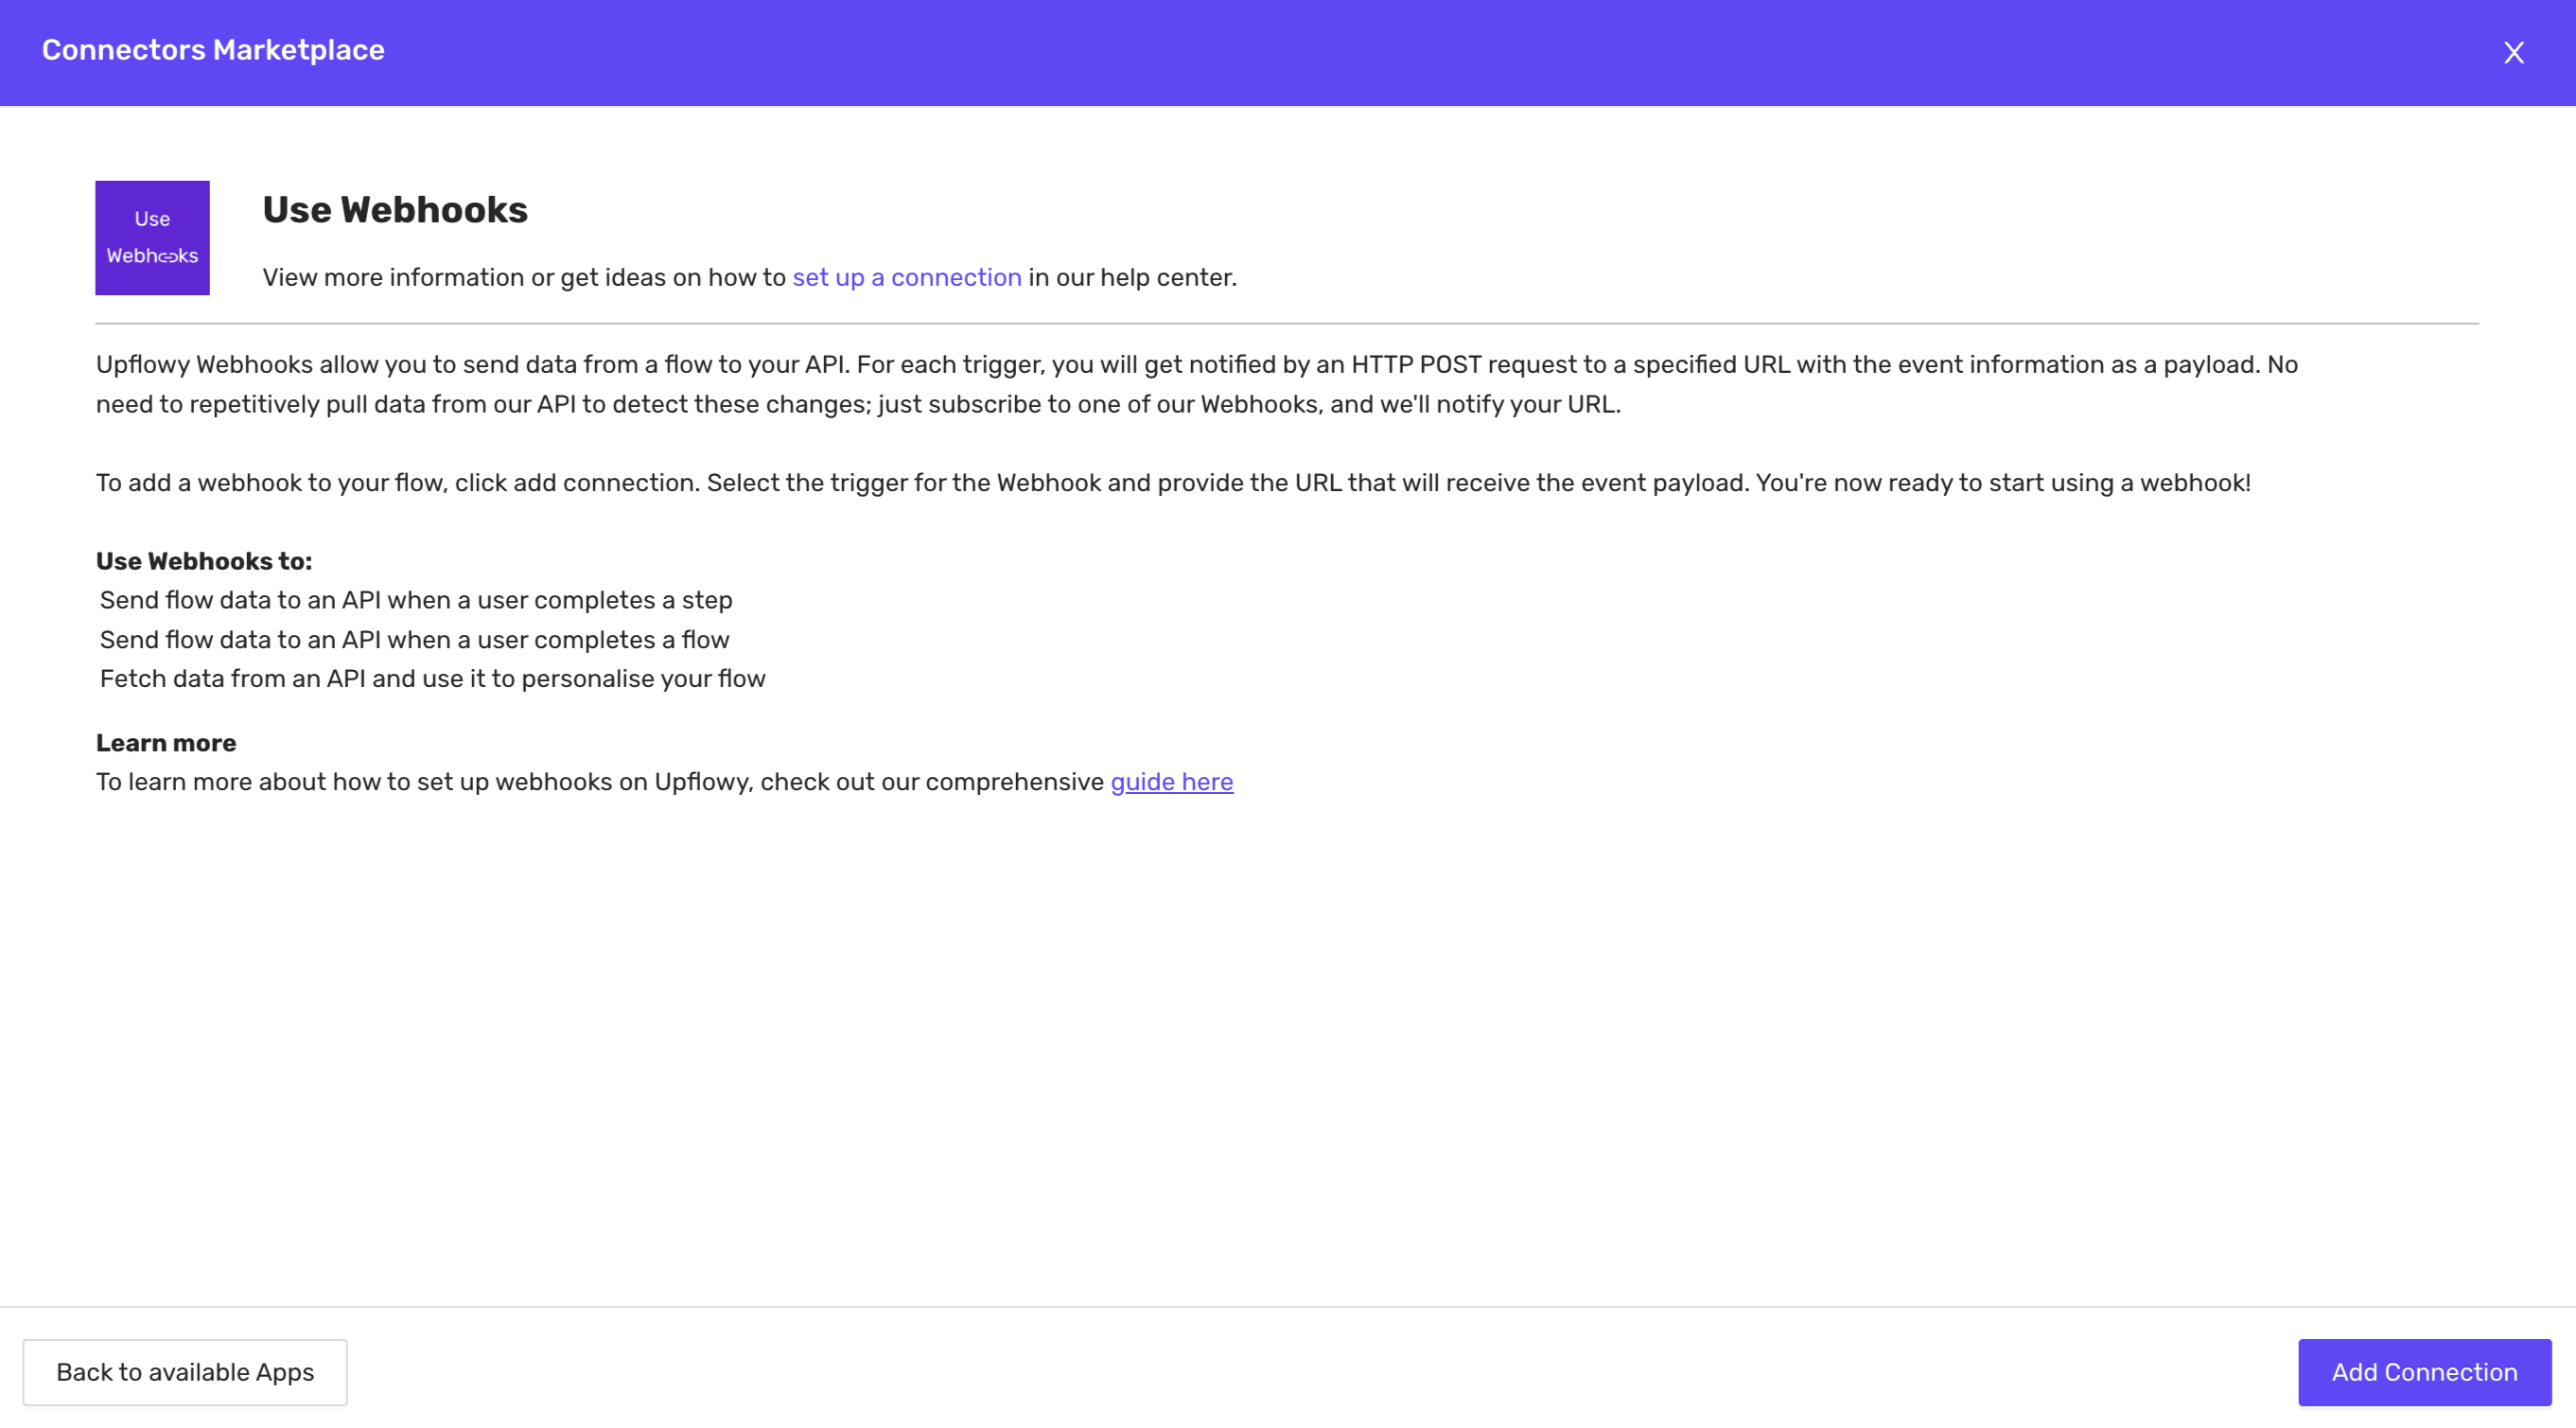
If you want to connect and share data between Upflowy and your tools by using an API or leveraging services like Zapier and Make, then Use Webhooks.
The use of Webhooks allows you to send or display data between Upflowy and your applications. You can set up multiple connections per step or at the end of the flow. For each connection, you’ll get notified by a POST, PUT, or DELETE request to a specified URL with the event information as a payload.
Here are a few things you can do with Use Webhooks:
- Connect Upflowy to your apps through Zapier and Make.com
- Send flow data to an API when a user completes a step
- Send flow data to an API when a user completes a flow
- Fetch data from an API and use it to personalize your flow
Navigate to Webhooks
To Use Webhooks ensure you are on the Edit tab at the top of your screen, then a panel will appear on your right.
Navigate to the Connectors tab on the left panel. You can add webhooks per step or at the flow view.

Select the Add connector button and a modal will appear. Choose Use Webhooks.
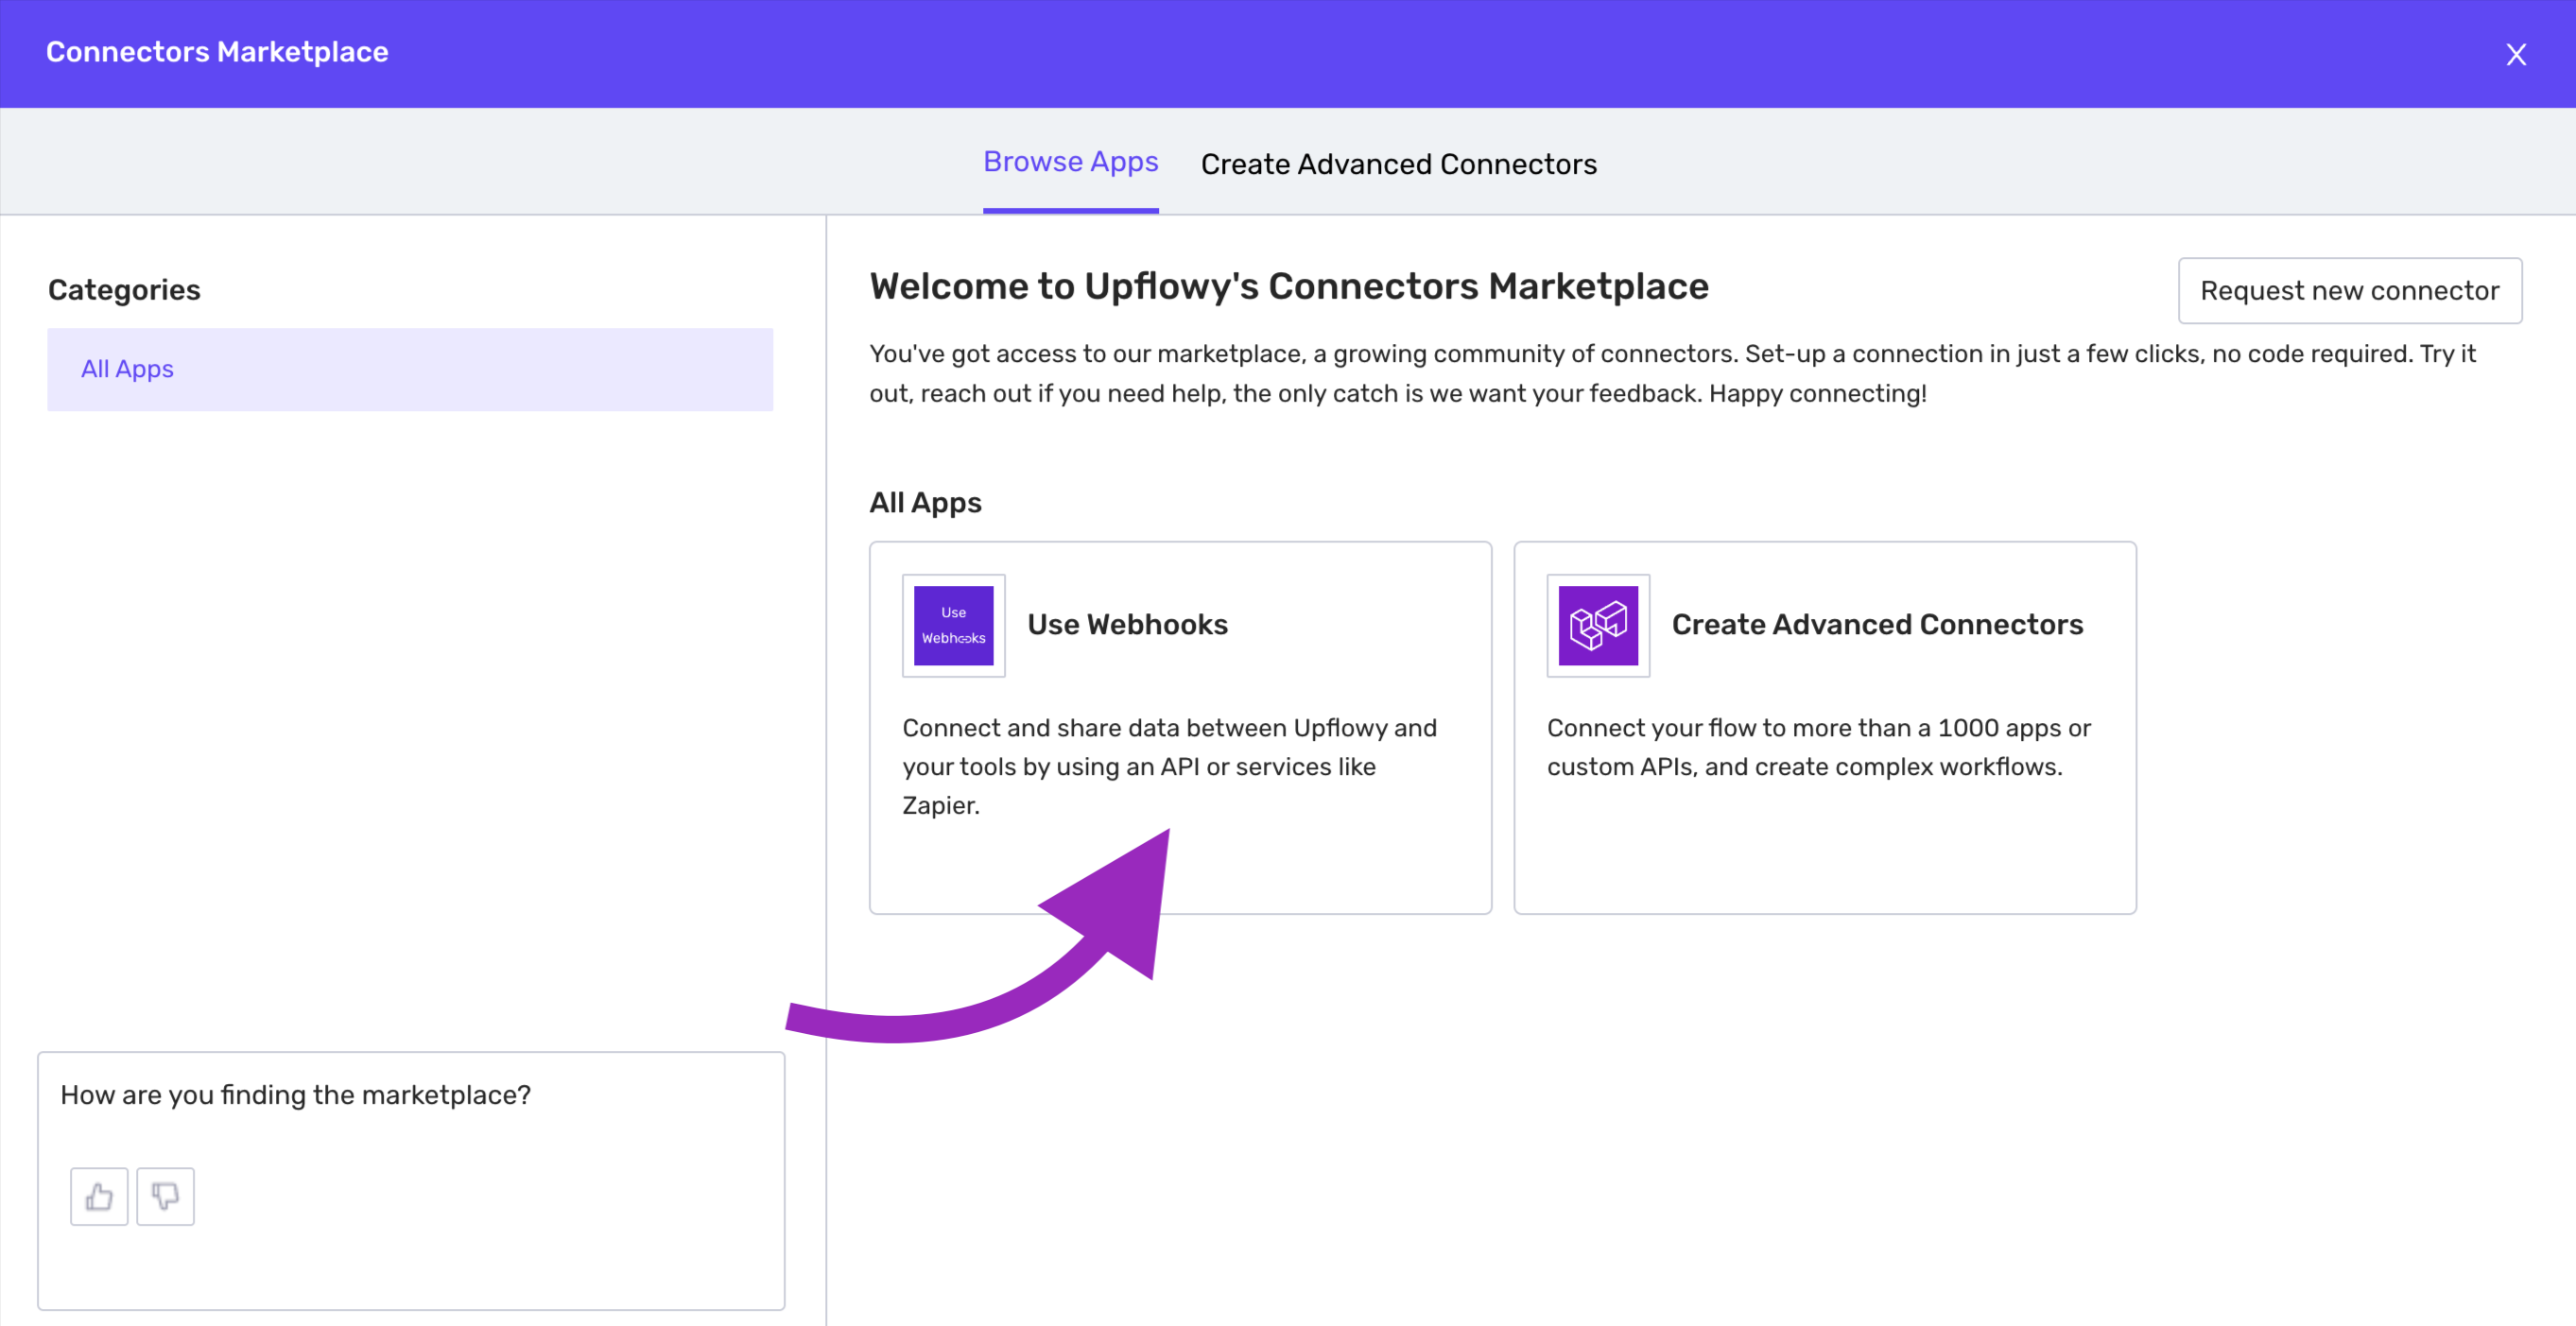
You will enter the details screen for that connector. Select Add Connection to begin.
Set up Webhooks
You can Use Webhooks to either
- Push Upflowy data to an API
- Display third party data
There are 3 steps to setting up Use Webhooks:
STEP ONE: Choose what happens in Upflowy to start this connection
Select a trigger or event that kick-starts this Webhook.
Currently, you can start a connection when a customer:
- Completes a step
- Finishes the flow
If you choose step complete, use the dropdown to select the step this connection happens at. By default this is set to the step you were on when you selected 'add connector'. If you add the connection at flow view this will be empty.
STEP TWO: Choose an action
Enter the URL you want to request to send data to or display data from
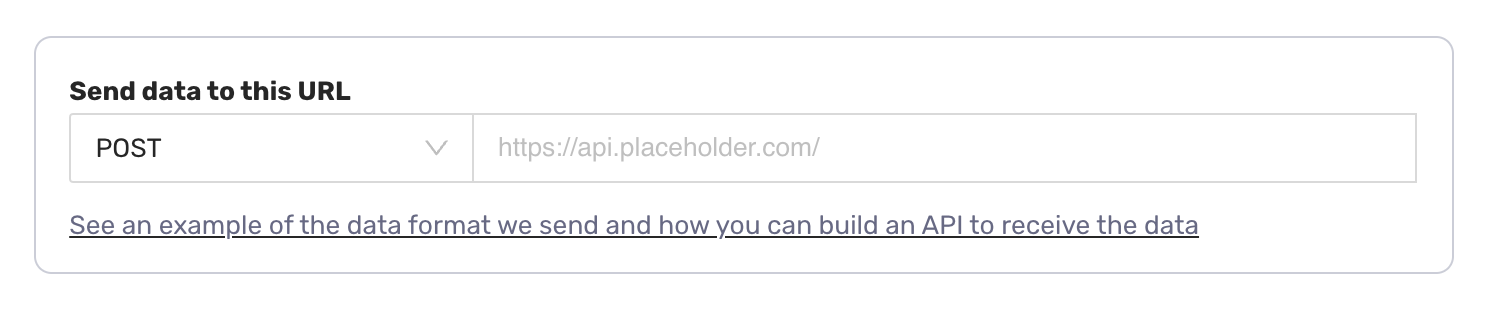
You can choose from the following methods for the API:
- POST, this method submits data to the specified API
- PUT, this method updates all current representations of the target resource with the request payload
- DELETE, this method deletes the specified resource
STEP THREE: Setup
Configure the connection and manage how it works.
The setup settings include:
- Connection Name: name your connection so it is easy to remember what the connection does. E.g. Send data to Airtable through Zapier
- Step Progression: Do you want customers to immediately progress to the next step in the flow, or wait for a response from your external system? Waiting is a great option if you’re personalizing the experience based on what comes back after sending data.
- Asynchronous, the default for a connection, means customers can immediately move to the next step without waiting for a response from the URL provided. Use an asynchronous connection when you want to send your data to a spreadsheet.
- Synchronous, means a customer needs to wait for a response from the URL before moving onto the next step. Use a synchronous connection when you want to show the opening hours of your business depending on the day the user visits your flow.
- HTTP Headers: Use HTTP Headers to pass additional context and metadata about the request or response. Content-Type is ‘application/json’. This isn’t a mandatory field.
- Fields to include in payload: These are the fields that have been gathered up to this step that you wish to send to the URL provided. Private fields are sensitive data and aren’t stored by Upflowy. You can check or uncheck data captured from the different components up until the step you are sending the data from.
Select Save and Add and your connection will be added to your flow. Publish to make your connection live. You can edit or delete your connections by visiting the Connectors tab.
How Upflowy format the data we send
Let’s see an example of how Upflowy structures data. Imagine you have created a step with a names input and an input field it would look like the following:
submittedAt: 1665032923535
context: {…}
initial: "6w6fX5yKbJMqF1LQzJrAvy"
name: "Linux"
version: "x86_64"
type: "desktop"
city: melbourne
region: vic
country: AU
stateEnteredDate: "2022-10-06T05:08:36.372Z"
first_name: "dave"
last_name: "smith"
input_3uxh: "dave.smith@company.com"
values: {}
pageUri: "http://127.0.0.1:8080/upflowy-iframe-embed.html"
pageId: "eur33vHEbkZi7sLBZsPkb1"
userId: "ZGxDoWgNU82cJJLm9FZR0ES4UBpW"
userIP: null
The data is formatted just to be a flat list inside the request body, so for the Names Input, the ID for the first name and last name are just first_name and last_name. You can also see the Input component, where the email has been captured, has the ID of input_3uxh.
Let's see a second sample flow and see how the data is captured for that step in Upflowy:
{
"submittedAt": 1643712450889,
"context": {
  "initial": "_origin_",
  "name": "Mac OS",
  "version": "10.15.7",
  "type": "desktop",
  "city": "newcastle",
  "region": "nsw",
  "country": "AU",
  "sessionId": "d38ebe72-ab8f-43f5-8ed7-23eb3fbf3c4e",
  "stateEnteredDate": "2022-02-01T10:47:17.883Z",
  "main_reasons": "Capturing my own life experiences for posterity;Sharing my Life Lessons with future generation",
  "topics": "Education;Cultural heritage",
  "values": {}
 },
"pageUri": "http://127.0.0.1:8080/upflowy-iframe-embed.html",
"pageId": "v33PauwoLEAgv6PB3rYqrS",
"userId": "zniZA9KRzROLY6Ss6SNfmR8isdA2",
"userIP": "141.168.190.63"
}
The above screenshot shows how Upflowy data will be sent for a Multiple Choice component. The information sent is based on a customer's answers to a component, in this case, ‘Education’ and ‘Cultural heritage’. In this example, 'main_reasons' and 'topics' are bespoke questions asked by the flow creator.
Upflowy also captures a series of default parameters including type of device, country, and date added. You can view these in the Answers page when your published flow is visited by customers. You’re also able to add custom parameters, “CustomParam” in the image above, read more on custom parameters here.
Using Webhooks with Zapier
See our step-by-step guides on how to integrate Upflowy with other platforms, using Zapier.
- Send Upflowy data to a CRM using Zapier
- How to send Upflowy data to Airtable using Zapier
- How to send Upflowy data to Google Sheets using Zapier
Using Webhooks with Make (formerly Integromat)
See our step-by-step guides on how to integrate Upflowy with other platforms, using Make.
- How to send Upflowy data to ClickUp using Integromat
- How to integrate Upflowy with Gmail via Make (formerly Integromat)
- How to send Upflowy data to Mailchimp using Integromat
Glossary
| Webhooks | Webhooks are a way for apps to send automated messages or push data automatically from one app to another. They have data, in the case of Upflowy formatted as a payload, which is sent to a unique URL. Upflowy can push this data to any URL. We format our data in a specific way so that on tonot all applications can read it. That is why you can leverage tools like Zapier or Make to translate the data so your systems can read it. |
| Synchronous | Synchronous means a customer needs to wait for a response from the URL before moving onto the next step in the case of Upflowy. Synchronous connections occur at the same time. Imagine communicating with someone via phone, video or face-to-face, you can give real-time feedback. Think of throwing a dog a stick, you have to wait for the dog to return with the stick to keep playing. |
| Asynchronous | Asynchronous means customers can immediately move to the next step without waiting for a response from the URL provided in Upflowy. Asynchronous communication can be exchanged at any time and doesn’t require an immediate response. Imagine communicating by email or watching a video recording of a lecture. Think if you were playing fetch with a dog you would have an endless pile of sticks next to you to just keep throwing, you don’t need the dog to bring one back to continue. |